![How to Delete Incognito History From Your Device: [Safeguard Your Privacy]](https://www.familyorbit.com/blog/wp-content/uploads/2023/08/how-to-delete-incognito-history-from-your-device-809x485.jpg)
What is called “incognito mode” is actually a private way to browse the internet, and most browsers of the internet have this feature. It lets the person surfing the internet do so without leaving a digital trail that could be used to track activity online. Incognito mode is a very efficient tool when it comes to trying to keep privacy secure, but it isn’t foolproof.
After all, figuring out how to delete the history of your incognito session is not a straightforward process. This is the biggest problem facing incognito web browsers today, and it gets in the way of what incognito browsing was made for. Some loopholes allow a person to see the incognito history on their device. For this reason, we’ll spend the rest of this article giving you a clear and thorough guide on how to clear your incognito history.
You could be a curious browser, or someone seriously concerned about your privacy as you browse the web; either way, we will help you understand how to delete incognito history and take advantage of the incognito feature in general.
Clearing Incognito History: Step-by-Step Guide
As previously mentioned, using the incognito feature on a browser without deleting that browser’s history from the device is an exercise in futility. You’ll need to know how to delete this history if you’re going to keep your privacy safe after you finish your web-surf session.
In the next section, we’ll give you a how-to guide for each type of device: macOS, Android, Windows, and iOS!
A. Android
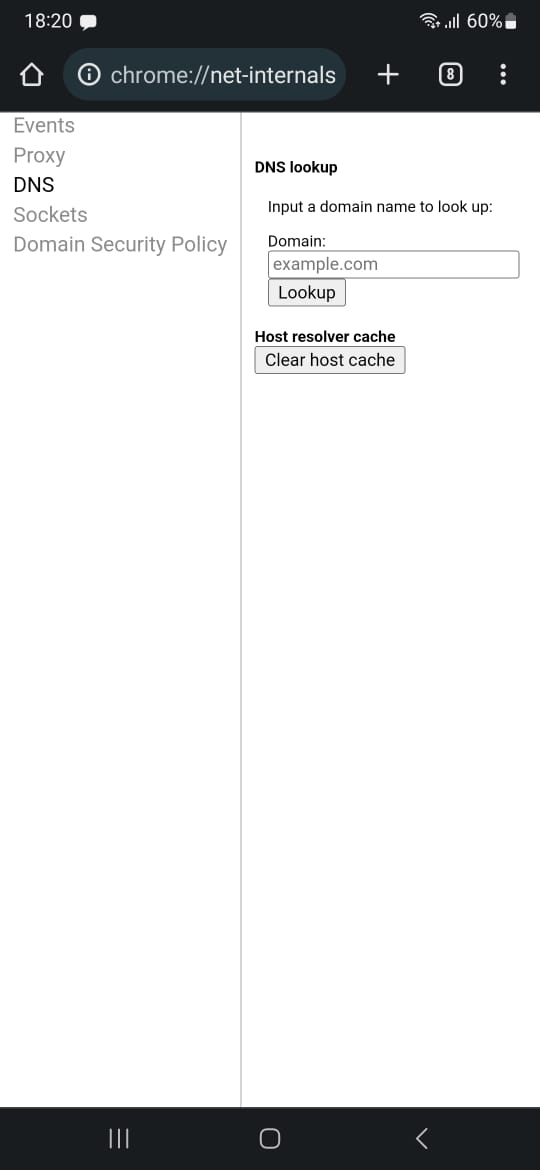
Step 1 – Access Google Chrome’s browser from your tablet or your Android mobile phone.
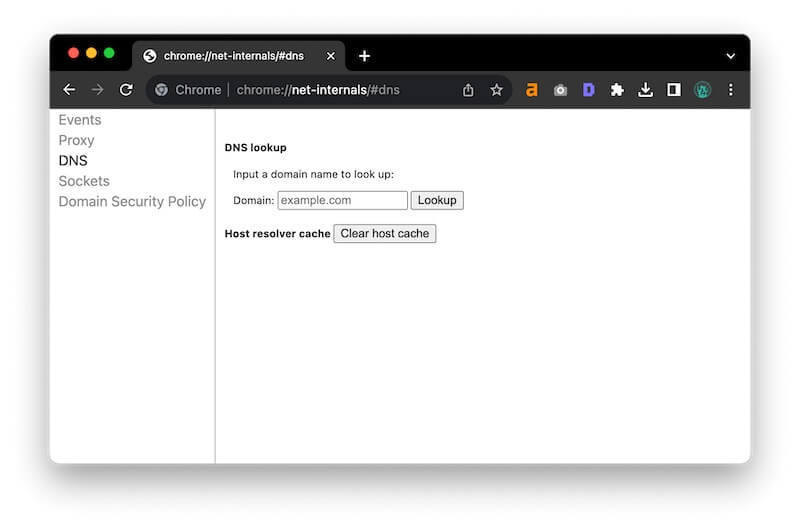
Step 2 – Type in “chrome://net-internals” in your address toolbar within Google Chrome.
Step 3 – Click on the “DNS” button in the menu on the left.
Step 4 – Click on the “Clear” button for your host cache.
Step 5 – Your browsing history in incognito mode is deleted from your Android, successfully!
Now that you’ve figured out how to get rid of that pesky incognito browsing history, let’s take a look at how to do it on your regular browsing history, just for good measure! This will include other data like cookies which leave a trail after non-incognito browsing. Check out the guide below:
- Access Google Chrome’s browser from the Android or tablet, again.
- Tap on the menu button, which looks like three dots, on the righthand, top corner of the screen.
- Select the “History” option from the following dropdown menu.
- Tap on the bottom of the screen’s “Clear Browsing Data” option and confirm.
- Click on the range of time you want to delete data, such as “Last 24 Hours,” “All Time,” or “Last Hour.”
- Make sure the kinds of data you’re looking to clear are selected, such as Cached images, browsing history, cached files, and cookies.
- Finish by tapping on “Clear Data.”
Remember, the above tips only clear the browsing data you accumulate after browsing on a non-incognito Google Chrome browser. This process won’t have any effect on your incognito data, which will be deleted automatically when the window or tab is closed.
B. iOS
Unfortunately, iOS doesn’t actually have a feature built into its functions, or even an option in settings, to clear out its DNS cache. This is in contrast to most operating systems found on the desktop and is inconvenient. That being said, if you have issues with your DNS on your device, you can take some action to try and resolve those issues.
We’ll go over these below:
- iOS Restart – You will not be able to delete your DNS cache manually, but you can clear out problems with a quick restart of the device itself, much like turning something on and off again and finding that it works!
- Turn Airplane Mode Off and On Again – Just like a simple restarting of the device can settle things, restarting your iOS device’s Airplane Mode works wonders. It turns off certain network settings, and then activates them anew, which can clear up problems with DNS.
- Delete Safari Browsing Data – If your Safari web browser is the place where you’re noticing DNS issues, the best thing to do is to eliminate the browsing data on that browser. Do this in the Settings section, navigating to the button called “Clear Website Data and History.”
- Swap DNS Server – If your iOS device is having a DNS malfunction, it may be an ISP problem. Go to the Settings section, then Wi-Fi, and then look at the information for your Wi-Fi. Click on “Configure DNS,” then “Manual, and enter the server address you want to use. Save this, disconnect from Wi-Fi, and then reconnect.
- Change to VPN – Another great option if changing DNS fails is to swap over to a VPN app. These route traffic from the internet through their own servers instead of the faulty DNS.
Remember, these tips might be great strategies for eliminating DNS problems, but they won’t do much in the way of getting rid of the cache of data in the iOS device, which is what other desktop systems would allow you to do.
Despite this disadvantage of using iOS keeping you from clearing out your incognito history on its own, you can still get rid of regular website data and a browsing history trail. This will actually eliminate any trail left by your incognito session on the way! Follow the plan below to execute this:
- Open Your iOS device’s Settings.
- Swipe down and click on the “Safari” web browser.
- Clear the Website Data and History.
- Confirm that this is what you want to do.
C. Windows
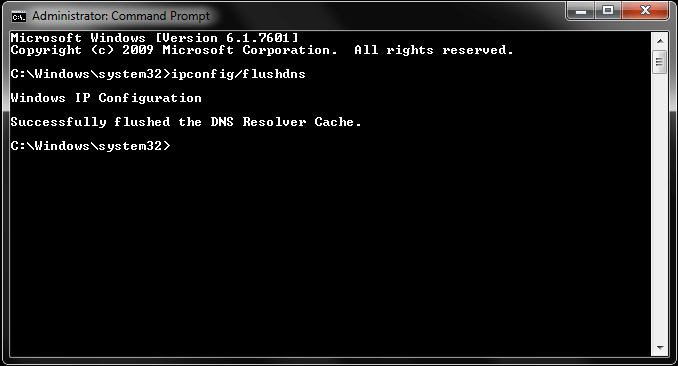
If you’re trying to do the same thing on a laptop or a Windows PC, all you need to do is run a specific type of command, much like “Command Prompt,” on Windows. We’ll show you how below:
- Press the Windows key and the R key together to “Run Command.”
- In the text box, type in “CMD” followed by “Enter,” which will open the Command Prompt.
- When the Command Prompt window opens, enter “ipconfig/ flushdns.” The DNS Cache will be cleared out, and so will all of the data you recently accumulated by browsing on the laptop or PC.
D. macOS
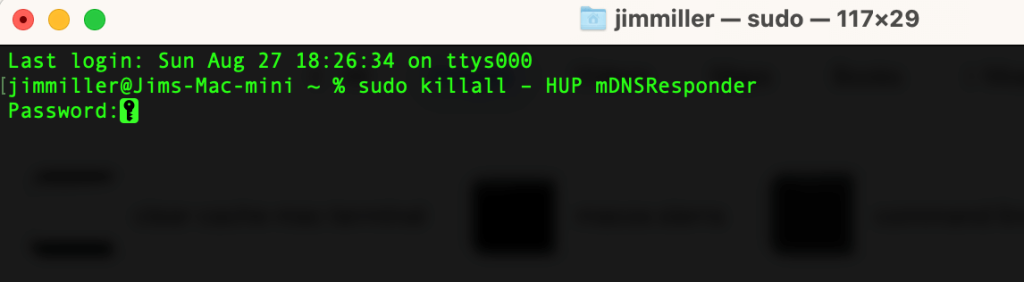
If you’re wondering how to delete your web incognito history on a Mac or MacOS device, you’ll need to use a Terminal Command. Find out how to do that below:
- Open “Applications” from the Mac, found in “Finder.” You can also type “Command + Spacebar” and search for Applications from there for easy access.
- Find the Application called “Utilities” and tap to open it.
- Click on the “Terminal” option twice to launch it.
- Type in the resulting bar this specific phrase: “sudo killall – HUP mDNSResponder” and finally hit the Enter key. This may require the use of your macOS device password, but then the previous session of internet browsing’s history will be deleted successfully!
When these steps are taken, no matter which browser platform or specific device you have, you’ll be confident that your incognito history is manageable and deleted. This means your online privacy is entirely in your hands, making your personal data that much safer.
What Information Incognito Mode Hides and What It Doesn’t?
Although Incognito Mode does have some great features, the name might be a bit misleading. After all, though it certainly leaves out some stored information, it is incapable of truly hiding your activity online from ISPs, otherwise known as Internet Service Providers, and even websites that are visited.
To be clear, if you wind up signing into your Google account for any reason, or, in fact, any kind of online account, the host of that account will log your activities themselves; there is nothing incognito mode does to stop this.
Information that Incognito Mode Does Hide

Below is a list of the information that Incognito Mode succeeds in hiding, specifically:
- Cookies – These are little data blocks that a web server creates and stores on the computer of the user during a session.
- Browsing History – This is basically a list of each web page a browser visits in a session, but it also includes a log of the time those pages were visited and the title of the pages, stored in web browsers for the convenience of the user.
- Form Data – This usually refers to extra information that comes with a chat or correspondence online, normally the region that the browser is being accessed from or the email address.
All of these are hidden by incognito mode, but remember, service providers and websites keep their own information unprotected from Incognito Mode.
How to Use Incognito Mode Effectively
There might be some temptation to panic if you’ve only just now realized that incognito mode doesn’t truly hide every bit of your online information from websites or ISPs. Instead of panicking, check out our step-by-step guide on how to activate incognito mode on the most frequently-used web browsers.
How to Use Incognito Mode Effectively on Google Chrome

- Open Google Chrome – This can be done by using the “Command + Spacebar” shortcut on macOS devices, then typing in “Chrome” to launch the application quickly. You can also simply navigate to “Applications” and click on “Google Chrome,” or tap the colorful app icon on a tablet or phone.
- Open an Incognito Window – To do this, you can either use a quick keyboard shortcut or click the option. The keyboard shortcut for an incognito window is “Ctrl + Shift + N” on a Windows Computer, but “Command + Shift + N” on a Mac device. You could also click the three vertical lines in the top right of the screen and select the option from there.
- Read the Warning – Every time Chrome opens an incognito browser, it treats the user to a warning. It may be tempting to skip this, but read it carefully to remind yourself each time of what kind of information incognito mode will not protect; then continue surfing with the appropriate caution!
- Delete Incognito Data – Remember to refer to the above guide and delete any trace you left behind while surfing, even in Incognito mode, for the best results!
How to Use Incognito Mode Effectively on Microsoft Edge
- Open Microsoft Edge – This can be done from the desktop of a Microsoft computer.
- Open an Incognito Window – The incognito window for Microsoft Edge is actually called “InPrivate,” since “incognito” was already taken! Open it by using the same shortcut you would for a Google Chrome window, or click on the “New InPrivate Window” option under the menu of the web browser.
- Turn on Anti-Tracking – Microsoft Edge has an extra anti-tracking setting that should be turned on for more effective privacy protection as soon as a user opens an InPrivate Window. Do this by clicking on “settings,” then “privacy,” and then “search” and “services.” From there, toggle the tracking prevention to “On.”
How to Use Incognito Mode Effectively on Firefox
- Open Firefox – This can be done from the Applications section or the desktop.
- Open Private Browsing – The Incognito of Mozilla Firefox is “Private Browsing.” This tab can be opened with the keyboard shortcut: “Crtl + Shift + P” or “Command + Shift + P” depending on which device you use, or select it from the top-right menu.
- Select Tracking Protection Settings – If you click on the shield to the left of the Private Browsing toolbar, you can then change the “Tracking Content” to either Standard, Custom, or Strict for more control over what is blocked and what is not.
How Does Incognito Mode Store Data on Devices?
Even with Incognito Mode on, many websites can follow an IP device through tracking after you’ve visited their page. Although you may be using a private browser on the web, remember that the DNS cache is saved to a device locally, and with some mastery of coding, you can get to this, as we’ve demonstrated above.
Don’t forget that ISPs can also choose to follow incognito mode users’ online activity and are not prevented. Therefore, though it may be called “Private Browsing,” this is not totally private.
Addressing Privacy Concerns Beyond Incognito Mode
There are other tools you can use to enhance your online privacy after learning that incognito mode isn’t thoroughly private. For example, you might choose to funnel your activity online through a VPN instead of a DNS, which stores a cache of your data.
You may also choose to install trusted ad blockers to enhance what incognito mode tries to do. Additionally, browser extensions can be added, such as HTTPS Everywhere or uBlock Origin, which can secure some information from websites even when they are visited by a user.
Remember, one of the best measures you can take for your own privacy is to simply regularly clear the cookies and browsing history from your browser.
In Conclusion
To sum it up, it is important to stay up to date with the latest privacy features and updates of your browser. Online privacy is an ever-evolving, ongoing process, but the continued vigilance that is required is well worth it.
You may be able to use incognito mode for some level of privacy as you surf the internet but don’t forget about incognito mode’s limitations. Manage your own history by manually deleting incognito browser history and cookies, yourself. The main point is: to remain proactive when it comes to your security, and your internet experience will be that much safer!
- Monitor Calls & Text Messages
- View Photos and Videos
- Location Tracking & Geofence
- Monitor WhatsApp & Kik
- Detect & Alert for Inappropriate Activities
- Monitor Websites Visited
- Compatible with Android and iOS